Step 1: Preparation & Batch Closure
Before proceeding, ensure that you are inside the epay App. If the application is not open, tap the icon shown below to enter the epay App.
-
 Perform Batch Closure: Close the current batch (End of Day/Z) on the terminal.
ATTENTION! If there are pending transactions in the terminal, the AADE activation process cannot be completed, and an error message will be displayed on the screen. Ensure the batch is fully cleared before moving to the next step.
Step 2: Terminal Configuration & Pairing
-
From the terminal’s main screen, select “AADE MENU”.
-
Select “Get WebECR Code”.
-
The message “AADE One Time Password:” will appear, followed by a random 6 or 8-digit OTP.
-
A receipt containing this code will be printed automatically.
-
Note: This OTP must be entered into the ERP by the technician to pair the devices.
-
-
Select “ECR Settings” to enter the configuration menu.
-
AADE STATUS: Ensure it is OFF (the “ACTIVATE” button should appear green) for initial setup.
-
Update Mode: Set to MANUAL.
-
Interface Settings: Ensure the following values are set (Update Mode must be MANUAL to change these):
-
USB / RS232 / TCP: Set to Disabled (circle should be white).
-
POS Print Reports: Set to Enabled.
-
CLOUD: Must be set to AADE. (If a different value is shown, contact epay support immediately).
-
-
-
Activate AADE Integration: Press the green “ACTIVATE” button.
-
A confirmation receipt will print.
-
The terminal will display “AADE FISCAL Status: No Connection” at the bottom of the main menu.
-
Note: Manual debit transactions from the POS menu are now disabled.
-
-
Middleware Connection:
-
Return to the Main Menu (press the back arrow twice).
-
The status MIDDLEWARE CONN STATUS: OFF will be displayed.
-
Press “CONNECT MIDDLEWARE” at the bottom right.
-
Upon success, the message “CONNECTED TO MIDDLEWARE” appears, and the status changes to ON.
-
Standby Mode: The POS will wait for an ERP command for 2 minutes. If no command is received, it will automatically disconnect (MIDDLEWARE CONN STATUS: OFF). If this happens, repeat the connection steps.
-
Step3: Post-Integration Operation & End of Day (Z)
Once the integration is successful, the POS keypad will be locked for direct transactions. Attempting to start a sale, refund, or cancellation directly from the POS will trigger the message “INACTIVE KEYPAD”.
Crucial: The POS must be CONNECTED TO MIDDLEWARE before initiating any transaction from the ERP.
End of Day (Z) / Batch Closure:
-
Press “CONNECT MIDDLEWARE” on the POS.
-
Initiate the “Z/Recovery POS” command from your ERP.
-
Perform the Batch Closure on the POS terminal.
-
Pending Transactions: If there are unsynchronized transactions, a warning will appear: “Have you performed Z/Recovery POS from the Cash Register?”
-
Select the “Red X” to cancel and perform the recovery first.
-
Select the “Green O” to proceed with batch closure.
-
Step 4: Available POS Functions
After integration, the available options in the POS Main Menu are limited to:
-
AADE MENU: Displays “AADE FISCAL Status: Connected”. The “DEACTIVATE” option is now disabled.
-
Pre-authorizations: (If enabled by epay for your business sector).
-
Loyalty Programs: (If enabled by epay).
-
Exit Button.
Integration with SBZ Provider API
To link your terminal with the SBZ Provider API, please follow the steps below:
- Access the Portal: Go to api.sbz.gr and log in to your account.
-
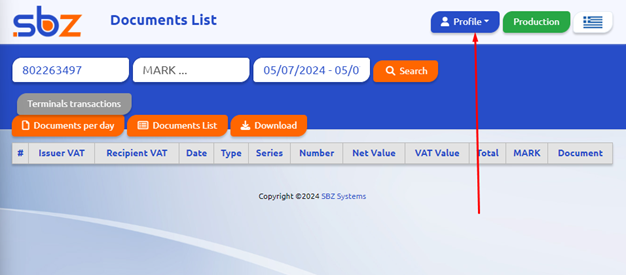
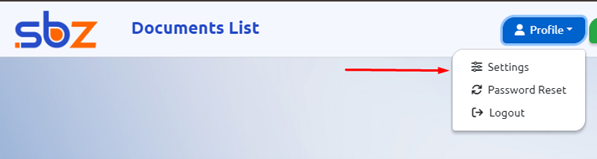
Navigate to Settings: Click on “Profile” at the top right corner and select “Settings”.
- Register Terminal: Locate the “Payment Terminals” section. In this field, enter the OTP/WebECR code that was displayed on your POS terminal screen.

-
Select Entity: Choose your company from the dropdown menu on the right.
-
Define Source: In the “SOURCE” field, provide a name for your POS (e.g., CARD). Important: Please use English characters only.
-
Save Changes: Click the “Add/Edit” button.
-
Verify Connection:
-
A “SUCCESS” message should appear, which may list multiple TIDs.
-
Since only one of these TIDs is active for the integration, you may need to repeat steps 3-6.
-
When repeating, enter the code in the format “TID:Code” (e.g.,
12345678:999999) in the terminal field. -
Test each TID provided until successful communication between the software and the terminal is established.
-