This applies ONLY to POS terminals that use the MELLON protocol
(CARDLINK, Worldline: Ingenico ICT 220, NBG: Ingenico Desk 3200/3500, Ingenico ICT 220/250, Ingenico DX8000, NEXI: Ingenico Desk 3200, Ingenico Desk 2600, Ingenico Move 2500, Attica Bank)
FOR THE UPGRADE:
First, you must close the current batch:
- F1 → Send Batch → Enter MID → Close Batch → Immediate
- F1 → Support → Update Parameters
- F1 → Support → Upgrade → Call Now (the device will restart) (technician password required)
- F1 → Support → Update Parameters
Integration
Step 1: Connection Method Selection
The first step is to activate the ERP integration from the POS Fiscal Menu.
Follow these steps:
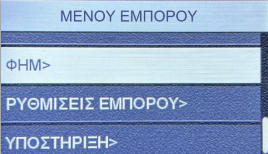
- Press the F button or the top-left menu icon to enter the Merchant Menu and select Fiscal (FHM).
 Select the second option “Connection” and press the green button.
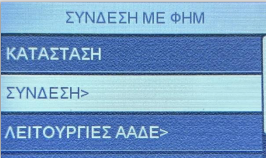
- Select the third option “Connection Settings”.
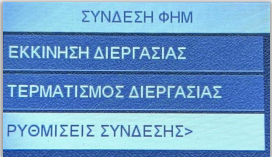 Then select the first option “FHM Connection Method”.
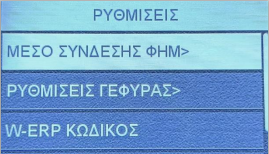
- Finally, select “W-ERP”.
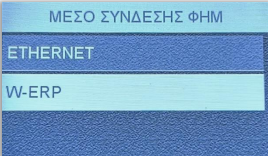
The terminal will return to the previous menu and the integration will be activated.
Step 2: Retrieve Code for ERP – POS Connection
Αfter activating the connection method, the next step is to retrieve the pairing code.
Steps:
- Press the F button or the top-left menu icon to enter the Merchant Menu and select Fiscal (FHM).
- Select “Connection” and press the green button.
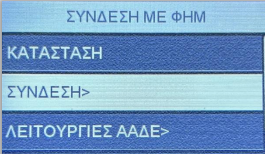 Select “Connection Settings”.
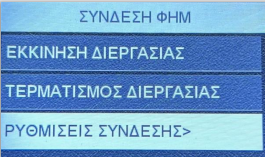 Select “W-ERP Code”.
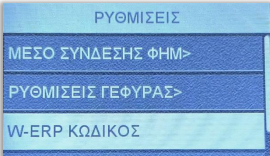 Press the green button and the message “Connecting to bridge…” will appear.

- After a few seconds, the code will be displayed on the POS screen.
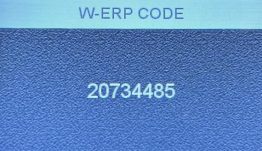 The ERP system will use this code for redeem/pairing.
These instructions are provided by MELLON.
    |
Connecting the POS to the SBZ IKE Provider API
- Go to api.sbz.gr.
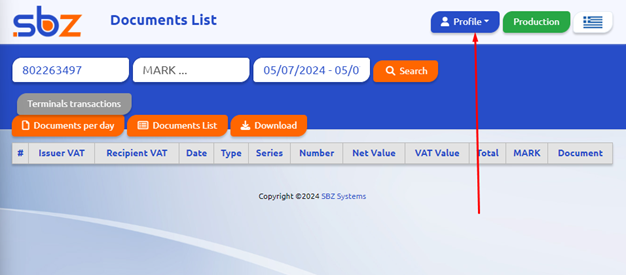
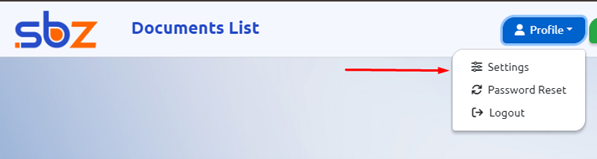
- At the top right, go to Profile → Settings.
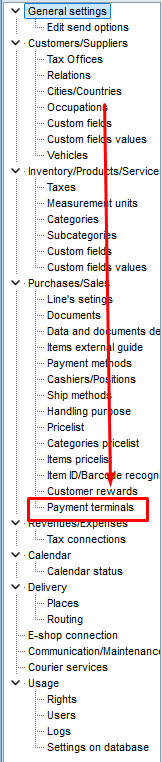
- Locate the field “Payment Terminals” and enter the code displayed on your POS terminal.

- Select the company from the dropdown on the right.
- In the SOURCE field, assign a name to your POS (e.g., CARD) (please enter it in LATIN characters).
- Click Add/Edit
- A SUCCESS message should appear.
(If you are using EMDI, continue below. Otherwise, please contact your software provider.)
Connecting the POS to EMDI
After upgrading EMDI, a new field will appear.
- Go to Payment Terminals.
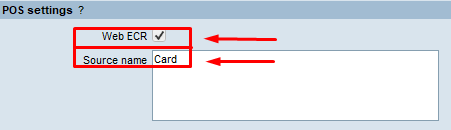
- Enable ✔️ WebECR
- In Source Name, enter the exact same name used in the API (e.g., CARD)
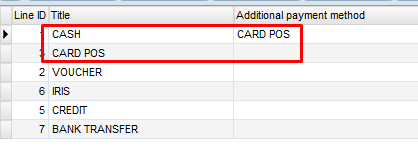
- Go to Payment Methods and create a new method, e.g., CARD POS.
- Set it as paid/settled
- Save, then close and reopen Settings ⚙️.
- Go to Payment Methods and under CASH, add the previously created method (CARD POS) as an additional payment method.
-
To keep reports consistent:
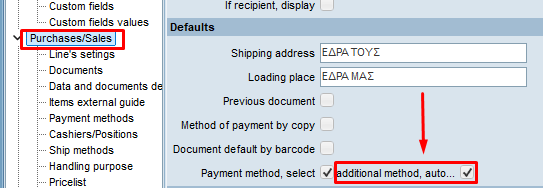
- Go to Settings ⚙️ → Purchases/Sales 🔴
- Enable ✔️ Payment method selection and automatic additional payment method
- Go to Tax Connections → Variable Mapping.
- For the payment method you created, set MyData Payment Method = 7 POS.

-
If you want to receive payments via POS:
- Go to Settings ⚙️ → Tax Connections → Variable Mapping
- Adjust the settings accordingly

- Go to Purchases/Sales 🔴
- Create a test retail receipt with product name POS TEST and value €0.10
- The default payment method should be CASH, so that the payment popup appears.
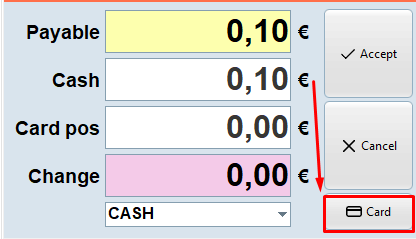
- In the payment screen:
- You can split the payment (e.g., part card / part cash)
- If paying by card, press the 💳 Card button
- A window will appear asking for installments or tip
- Select the created payment method (CARD POS)
- Confirm using the green button on the POS terminal
- Issue a refund receipt to test refund to the card via POS
-
If everything works correctly:
- Go to api.sbz.gr
- Verify that the 💳 icon appears on invoices paid by card
